


Replace a Garbage Disposal Splash Guard in 8 Steps
You may enjoy using the garbage disposal in your kitchen but that doesn’t mean you want to watch your hard-earned money go down the drain. The average service life of a garbage disposal unit is 8-15 years, which mostly pertains to the motor. However, there are some smaller parts that may wear out before then, such as the slash guard.
The good news is you can replace this individual part for just a few dollars instead of having an entirely new unit installed. Allow us explain how.
What does the splash guard do?
The splash guard is a rubber gasket that goes on top of the garbage disposal. When the unit is mounted underneath the kitchen sink, the splash guard is positioned in between the drain and the disposal. The job of the splash guard is to prevent objects such as silverware from accidentally going down the drain into disposal. Also, when you turn on the blades, the splash guard prevents bits of food and water from coming back up the drain, which would be messy and potentially dangerous.
Since the splash guard is made of rubber, it is prone to tearing and cracking. When this happens, it’s a smart idea to replace it. You can purchase a replacement splash guard at most improvement stores. Consult the manual of your disposal to make sure you’re getting the right one.
What you’ll need
- Replacement splash guard
- Screwdriver (Phillips head or flathead, depending on screws for your disposal)
- Bucket
- Another person to help you, if possible
Steps for replacing splash guard
- Turn off the power to the garbage disposal. This can be done by either unplugging it from an outlet underneath the sink, or if it’s hardwired, you’ll need to find the electrical panel and turn off the breaker that serves the disposal. Always test that the power is off by flipping the switch to turn on the disposal.
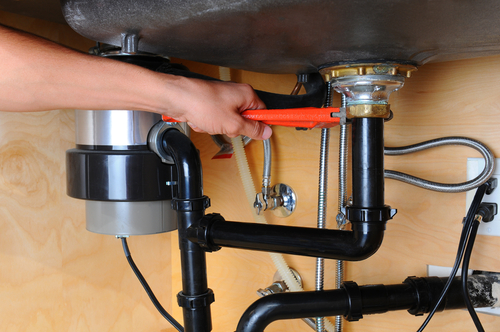
- Disconnect the drain pipe. First, place the bucket under the sink to catch any water. Next, find the connector between the cannister and the wastewater pipe. Unscrew the pipe and place it to the side. You may have two pipes to disconnect if the dishwasher ties into the disposal.
- Loosen the locking ring. Use your screwdriver to turn the ring counter-clockwise.
- Detach the disposal. Gently lower the unit from the mounting.
- Remove the old splash guard, clean off the rim, and snap on the new guard.
- Reconnect the disposal. The hardest part may be holding the canister up to the mounting area with one hand while tightening the locking ring with your other. This is where having another person helping you can be handy. Another tip is to use a stack of books to prop up the unit while you tighten it.
- Reconnect the drain pipes.
- Turn the power back on and give your garbage disposal a test run.
Replacing a splash guard can be a relatively easy DIY project. But if you run into any trouble or would prefer a professional do it in the first place, don’t hesitate to call Reichelt Plumbing. We have a team of trustworthy, experienced plumbers ready to help. Call us at (219) 322-4906 to request an appointment.